80
80 100-5
80
80
80
80
80
80 0040
Drawing curved arrows is another special feature of the Diagram Macros, thus a process where the Diagram Macros need you help. In fact you will have to decide the length of the curved arrow and possibly you will have to adjust the spacing around the diagram (an easy procedure for that will be described in section 17).
Just plain curved arrows in the primary directions are provided by the Diagram Macros. The first letter of the command indicates where, with respect to the diagram, the arrow has to stand (this determines the concavity of the arrow); the second letter indicates the overall direction of the arrow; then follows the abbreviation +curve+ for ``curved arrow''. As usual, the two first indications are given using the compass-card terminology: +n,s,e,w+. Typing the first letter as an upper-case letter will produce a named arrow, the name being given as a first argument of the command. It is compulsory to give the length of the arrow as a last argument. By length of the arrow we mean clearly its horizontal or vertical extent (according to the case), expressed in points. For example +f160+ will produce a curved arrow with name f and length 160 points, to be positioned at the north side of a diagram and with overall east direction.
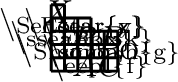
For more clarity, here are the eight unamed curved arrows (of
length 80 points) and the corresponding commands. The bullets
indicate the position of the formal centers (?!) of these arrows;
each bullet corresponds thus to the point which will coincide with
the corresponding point of the pattern.
80
80 100-5
80
80
80
80
80
80 0040
Most often you will have to include a curved arrow at a point of the pattern which is already occupied by another item, a vertex or an arrow; just use the ++ command of the previous section to superpose the two items. The length of a curved arrow will generally be a multiple of 80 points, since this is the normal distance between two vertices, in a primary direction. Here is an example of a diagram containing curved arrows: A a Bl160 b C e80fg h k D c E d F 2500 It should thus be typed as follows:
\DIAG
{A}\n{\Ear{a}} \n{\cross{B}{\Necurve{l}{160}}}
                          \n{\Ear{b}}\n{C}      \nn
{\cross{\Wncurve{e}{80}}{\Sbiar{f}{g}}}
   \n{}        \n{\saR{h}}\n{}       \n{\saR{k}}\nn
{D}\n {\eaR{c}}\n{E}      \n{\eaR{d}}\n{F}
\diagv{25}{13}{0}